Sin resumen de edición |
Etiqueta: rte-source |
||
| (No se muestran 48 ediciones intermedias de 5 usuarios) | |||
| Línea 1: | Línea 1: | ||
{{Enemigomenor |
{{Enemigomenor |
||
| − | |imagen = |
+ | |imagen = MM2PicopicoKun.png |
| − | |comentario_imagen = |
+ | |comentario_imagen = |
| − | |HP = |
+ | |HP = 3 (cada Block) |
| − | |Daño = |
+ | |Daño = 8 (contacto) |
| ⚫ | |||
| ⚫ | |||
| ⚫ | |||
|escrito = ピコピコくん |
|escrito = ピコピコくん |
||
|romaji = Pikopiko-kun |
|romaji = Pikopiko-kun |
||
|apariciones = [[Mega Man 2]]<br>[[Mega Man: The Wily Wars]] |
|apariciones = [[Mega Man 2]]<br>[[Mega Man: The Wily Wars]] |
||
| − | |otros = |
+ | |otros = |
| − | |Sprite = [[Archivo:Mm2picopicomastersprite.png|MM2]]}} |
+ | |Sprite = [[Archivo:Mm2picopicomastersprite.png|MM2]] [[Archivo:Mmwwpicopico.png|The Wily Wars]]|debilidad = [[Bubble Lead]]}} |
| + | '''Block Phoenix Creature''', conocido en Japón como {{Japones|'''Picopico-Kun'''|ピコピコくん|Pikopiko-kun}}, es un robot disfrazado como un '''[[:Categoría:Sistema de Seguridad|sistema de seguridad]]''' que el [[Dr. Light]] usaba en su [[Laboratorio de Investigación del Dr. Light|propio laboratorio]]. El [[Dr. Wily]] lo encontró aparentemente mientras trataba de infiltrarse en el laboratorio del Dr. Light, en algún momento del pasado, e impresionado por su fuerza lo incorporó posteriormente a su fortaleza. |
||
| − | El '''PicoPico Master''' o {{Japones|'''Picopico-kun'''|ピコピコくん|Pikopiko-kun}} en Japón. Es el segundo Jefe de la Fortaleza del [[Dr. Wily]] en [[Mega Man 2]]. Consiste en un cuarto cerrado que puede crear de ellos mismos a un grupo de mini-robots, los cuales fueron creados originalmente por el [[Dr. Light]] con el fin de proteger su casa. Cuando el Dr. Wily vio lo efectivo que era este, creo su propia modificación como guardía en su fortaleza. Ellos atacan flotando en embestida a [[Mega Man (Personaje)|Mega Man]]. Cuando el suficiente número de estos es destruido el mismo cuarto se apaga por si solo. Siendo el [[Bubble Lead]], su debilidad principal, en el caso más peligroso, entonces, [[Metal Blade]] es la mejor opción. |
||
| ⚫ | |||
| ⚫ | |||
| − | [[Archivo:Picopicofight.jpg|thumb|left|Encuentro de PicoPico contra Mega Man.]] |
||
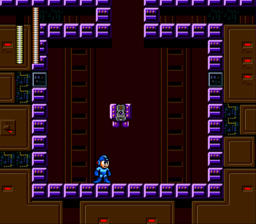
| + | En "'''''[[Mega Man 2]]'''''", Block Phoenix Creature es el [[Jefe de Fortaleza]] del 2º [[Wily Castillo (Mega Man 2)]]; son en sí 8 robots que atacan consecutivamente.__TOC__{{-}} |
||
| − | '''Estrategia:''' PicoPico Master resulta ser el 2do [[Jefe de Fortaleza]] durante el juego; el jugador se debe encontrar enclaustrado en una habitación sellada con paneles de color rosado, cada dos paneles iran combinandose formando una copía de PicoPico, persiguiendo luego al jugador por la pantalla. |
||
| ⚫ | |||
| ⚫ | |||
| ⚫ | |||
| + | |imagen = BlockPhoenixCreature-Batalla.png |
||
| + | |comentario_imagen = Block Phoenix Creature vs. Mega Man<br>Wily Castillo, Mega Man 2. |
||
| + | |sprite = Mm2picopicomastersprite.png |
||
| + | |HP = 3 x 4 + 4 x 4 |
||
| + | |debilidad = Bubble Lead |
||
| + | |daño_contacto = 8}}{{Aclaracion|Block Phoenix Creature es el 2º [[Jefe de Fortaleza]] en el [[Wily Castillo (Mega Man 2)]].}}'''Estrategia:''' Una vez que has caído dentro de la habitación de batalla, 2 paneles se moveran en un intento de ensamblarse, así se formará el 1º Block Phoenix Creature (si quedas atrapado en medio del ensamble, "morirás"), Block Phoenix Creature se dedicá a seguirte y golpearte a una velocidad relativamente lenta. Utiliza el '''[[Bubble Lead]]''', 1 de las burbujas destruye automáticamente a 1 Block Phoenix Creature. Posteriormente, otros 2 paneles se desplazarán formando un 2º Block Phoenix Creature, el cual poseé cierto aumento de velocidad; esto proseguirá hasta el 8º y último Block Phoenix Creature, que es el más rápido de la serie. Haz uso del Bubble Lead en todos ellos.{{Plantilla:CartillaDaño |
||
| ⚫ | |||
| + | |daño1 = 1:1 |
||
| + | |arma2 = [[Metal Blade|M]] |
||
| + | |daño2 = 1:1 |
||
| + | |arma3 = [[Air Shooter|A]] |
||
| + | |daño3 = 0:0 |
||
| ⚫ | |||
| + | |daño4 = 3:3 |
||
| + | |arma5 = [[Quick Boomerang|Q]] |
||
| + | |daño5 = 1:1 |
||
| + | |arma6 = [[Crash Bomber|C]] |
||
| + | |daño6 = 1:1 |
||
| + | |arma7 = [[Time Stopper|F]] |
||
| + | |daño7 = 0:0 |
||
| + | |arma8 = [[Atomic Fire|H]] |
||
| + | |daño8 = 1:3:3<BR>1:3:3 |
||
| + | |arma9 = [[Leaf Shield|W]] |
||
| + | |daño9 = 0:0|nota = Para cada arma, el primer dígito es el daño recibido en el "MODO NORMAL"; el segundo dígito, es el "MODO DIFÍCIL".}}{{-}} |
||
| + | ===[[Mega Man: The Wily Wars]]=== |
||
| − | Resulta una derrota si el jugador queda atrapado en medio de la combinación de PicoPico; la mejor estrategia es la esquivación y el lanzamiento de Bubble Lead a pocos pasos, si no en caso contrario, puede evitar el proyectil. |
||
| + | [[Archivo:PicopicoBatallaWW.png|thumb|right|Block Phoenix Creature vs. Mega Man, Mega Man: The Wily Wars.]]{{Plantilla:Aclaracion|Mega Man: The Wily Wars es un "remake" de Mega Man 2, por ello solo repiten los eventos de este juego.}} |
||
| ⚫ | |||
| + | |||
| ⚫ | |||
| + | '''Estrategia:''' Una vez que has caído dentro de la habitación de batalla, 2 paneles se moveran en un intento de ensamblarse, así se formará el 1º Block Phoenix Creature (si quedas atrapado en medio del ensamble, "morirás"), Block Phoenix Creature se dedicá a seguirte y golpearte a una velocidad relativamente lenta. Utiliza el '''[[Bubble Lead]]''', 1 de las burbujas destruye automáticamente a 1 Creature. Posteriormente, otros 2 paneles se desplazarán formando un 2º Block Phoenix Creature, el cual poseé cierto aumento de velocidad; esto proseguirá hasta el 8º y último Block Phoenix Creature, que es el más rápido de la serie. Haz uso del Bubble Lead en todos ellos. |
||
| − | ===='''[[Rockman 2]]'''==== |
||
| + | |||
| ⚫ | |||
| ⚫ | |||
{{RCWdata |
{{RCWdata |
||
|Image = [[Archivo:R2CW-37.png]] |
|Image = [[Archivo:R2CW-37.png]] |
||
|No = 37 |
|No = 37 |
||
| − | |Name = Picopico- |
+ | |Name = Picopico-Kun |
| + | |HP = 28 |
||
| + | |AT = 08 |
||
| + | |Weak = [[Archivo:rm2_bubble.gif|Bubble Lead]]|Rockman = 2|JName = ピコピコくん |
||
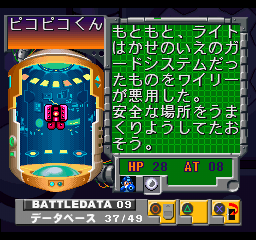
| + | |Data = もともと、ライトはかせのいえのガードシステムだったものをワイリーが悪用した。安全な場所をうまくりようしてたおそう。 |
||
| + | |T = Originalmente, era un sistema de seguridad para la casa del Doctor Right pero fue robado por Wily. Busca un lugar seguro y atácalo.}} |
||
| + | |||
| + | ===Datos en [[Mega Man Legacy Collection]]=== |
||
| + | {{MMLCdata |
||
| + | |MMLC = <br>(Mega Man 2) |
||
| + | |Image = [[Archivo:MMLCdatapicopicokunMM2.png|250px]] |
||
| + | |Name = Picopico-Kun |
||
| + | |Dato = Originalmente era un sistema de seguridad en la casa del [[Dr. Light]], pero el [[Dr. Wily]] lo remodeló para que fuera malvado. Busca un lugar seguro y elimínalo desde allí. |
||
|HP = 28 |
|HP = 28 |
||
|AT = 08 |
|AT = 08 |
||
|Weak = [[Archivo:rm2_bubble.gif|Bubble Lead]]}} |
|Weak = [[Archivo:rm2_bubble.gif|Bubble Lead]]}} |
||
| ⚫ | |||
| ⚫ | |||
| − | |Imagen = [[Archivo:Picopicostage.jpg]] |
||
| − | |Shot = [[Archivo:MM2Wilymug.png]] |
||
| − | |Name = PicoPico Master |
||
| − | |Titulo = Escenario 2 del Dr. Wily |
||
| − | |BD = Un sistema de ventilación, compuesto por grandes campos de Espinas. |
||
| − | |mision = Llegar al Escenario 3. |
||
| ⚫ | |||
| − | == |
+ | ===Datos de Escenario=== |
| + | <tabview> |
||
| ⚫ | |||
| + | Castillo de Wily/Escenario del Dr. Wily 2|Castillo de Wily |
||
| + | </tabview> |
||
| ⚫ | |||
| − | {| cellpadding="0" cellspacing="0" style="background-image: initial; background-attachment: initial; background-origin: initial; background-clip: initial; background-color: rgb(20, 102, 184); border-top-left-radius: 5px 5px; border-top-right-radius: 5px 5px; border-bottom-right-radius: 5px 5px; border-bottom-left-radius: 5px 5px; border-top-width: 2px; border-right-width: 2px; border-bottom-width: 2px; border-left-width: 2px; border-top-style: solid; border-right-style: solid; border-bottom-style: solid; border-left-style: solid; border-top-color: rgb(20, 102, 184); border-right-color: rgb(20, 102, 184); border-bottom-color: rgb(20, 102, 184); border-left-color: rgb(20, 102, 184); font-size: 12px; line-height: normal; background-position: initial initial; background-repeat: initial initial; " width="100%" |
||
| + | {{Plantilla:TablaEnemigos |
||
| + | |Nombre de tabla = Enemigos del 2° [[Wily Castillo (Mega Man 2)|Wily Castillo]] en [[Mega Man 2]] |
||
| + | |sprite1 = Mm2proptopsprite.png |
||
| + | |nombre1 = Prop-Top |
||
| + | |japones1 = Fly Boy |
||
| + | |descripcion1 = Un robot juguete-hélice que aplasta a sus enemigos. |
||
| + | |debilidad1 = [[Air Shooter]] |
||
| + | |sprite2 = Mm2crazycannonsprite.png |
||
| + | |nombre2 = Crazy Cannon |
||
| + | |japones2 = Shotman |
||
| + | |descripcion2 = Un robot que tiene una manguera de la cual salen disparos de energía. |
||
| + | |debilidad2 = [[Leaf Shield]] |
||
| + | |sprite3 = Mm2molesprite.png |
||
| + | |nombre3 = Stalactite |
||
| + | |japones3 = Mole |
||
| + | |descripcion3 = Un taladro robot que viene en gigantescos grupos taladrando desde el sub-suelo. |
||
| + | |debilidad3 = [[Leaf Shield]] |
||
| + | |sprite4 = Mm2presssprite.png |
||
| + | |nombre4 = Drop Spike |
||
| + | |japones4 = Press |
||
| + | |descripcion4 = Una gigantesca prensa metálica que aplasta cuando siente que algo se acerca demasiada a ellos. Son indestructibles.}}{{Plantilla:TablaEnemigos |
||
| + | |Nombre de tabla = Trampas del 2° [[Wily Castillo (Mega Man 2)|Wily Castillo]] en [[Mega Man 2]] |
||
| + | |precipicio = No. |
||
| + | |sprite1 = Picos2.png |
||
| + | |nombre1 = Picos |
||
| + | |descripcion1 = Picos que "matan" instantáneamente a Mega Man. |
||
| + | |sprite2 = BloqueDestruible-BlockPhoenixCreature.png |
||
| + | |nombre2 = Muro Especial |
||
| + | |descripcion2 = Muro indestructible que protege un ítem valioso. |
||
| + | |debilidad2 = [[Crash Bomber]]}} |
||
| + | |||
| + | ==Cartilla de Daño== |
||
| ⚫ | |||
| + | {| cellpadding="3" cellspacing="1" align="center" style="line-height: normal; font-size:95%; -moz-border-radius:5px; border-radius:5px; border: 2px solid #1466B8; background-color: #1466B8; color:#000;" |
||
| |
| |
||
{| align="center" cellpadding="3" cellspacing="1" style="width: 656px; line-height: normal; font-size: 12px; background-color: rgb(20, 102, 184); " |
{| align="center" cellpadding="3" cellspacing="1" style="width: 656px; line-height: normal; font-size: 12px; background-color: rgb(20, 102, 184); " |
||
| − | ! colspan="12" style="font-size: 16px; color: white; background-color: rgb(20, 102, 184); "| |
+ | ! colspan="12" style="font-size: 16px; color: white; background-color: rgb(20, 102, 184); "|'''Mega Man 2''' |
|- |
|- |
||
| − | | style="text-align: center; width: 120px; background-color: rgb(198, 226, 255); border-right-width: 2px; border-right-style: solid; border-right-color: rgb(20, 102, 184); border-bottom-width: 1px; border-bottom-style: solid; border-bottom-color: rgb(20, 102, 184); "| |
+ | | style="text-align: center; width: 120px; background-color: rgb(198, 226, 255); border-right-width: 2px; border-right-style: solid; border-right-color: rgb(20, 102, 184); border-bottom-width: 1px; border-bottom-style: solid; border-bottom-color: rgb(20, 102, 184); "|'''Modo''' |
| − | | style="text-align: center; width: 120px; background-color: rgb(198, 226, 255); border-bottom-width: 1px; border-bottom-style: solid; border-bottom-color: rgb(20, 102, 184); "| |
+ | | style="text-align: center; width: 120px; background-color: rgb(198, 226, 255); border-bottom-width: 1px; border-bottom-style: solid; border-bottom-color: rgb(20, 102, 184); "|'''Plasma Cannon''' |
| − | | style="text-align: center; width: 120px; background-color: rgb(198, 226, 255); border-bottom-width: 1px; border-bottom-style: solid; border-bottom-color: rgb(20, 102, 184); "| |
+ | | style="text-align: center; width: 120px; background-color: rgb(198, 226, 255); border-bottom-width: 1px; border-bottom-style: solid; border-bottom-color: rgb(20, 102, 184); "|'''Metal Blade''' |
| − | | style="text-align: center; width: 120px; background-color: rgb(198, 226, 255); border-bottom-width: 1px; border-bottom-style: solid; border-bottom-color: rgb(20, 102, 184); "| |
+ | | style="text-align: center; width: 120px; background-color: rgb(198, 226, 255); border-bottom-width: 1px; border-bottom-style: solid; border-bottom-color: rgb(20, 102, 184); "|'''Air Shooter''' |
| − | | style="text-align: center; width: 120px; background-color: rgb(198, 226, 255); border-bottom-width: 1px; border-bottom-style: solid; border-bottom-color: rgb(20, 102, 184); "| |
+ | | style="text-align: center; width: 120px; background-color: rgb(198, 226, 255); border-bottom-width: 1px; border-bottom-style: solid; border-bottom-color: rgb(20, 102, 184); "|'''Bubble Lead''' |
| − | | style="text-align: center; width: 120px; background-color: rgb(198, 226, 255); border-bottom-width: 1px; border-bottom-style: solid; border-bottom-color: rgb(20, 102, 184); "| |
+ | | style="text-align: center; width: 120px; background-color: rgb(198, 226, 255); border-bottom-width: 1px; border-bottom-style: solid; border-bottom-color: rgb(20, 102, 184); "|'''Quick Boomerang''' |
| − | | style="text-align: center; width: 120px; background-color: rgb(198, 226, 255); border-bottom-width: 1px; border-bottom-style: solid; border-bottom-color: rgb(20, 102, 184); "| |
+ | | style="text-align: center; width: 120px; background-color: rgb(198, 226, 255); border-bottom-width: 1px; border-bottom-style: solid; border-bottom-color: rgb(20, 102, 184); "|'''Crash Bomber''' |
| − | | style="text-align: center; width: 120px; background-color: rgb(198, 226, 255); border-bottom-width: 1px; border-bottom-style: solid; border-bottom-color: rgb(20, 102, 184); "| |
+ | | style="text-align: center; width: 120px; background-color: rgb(198, 226, 255); border-bottom-width: 1px; border-bottom-style: solid; border-bottom-color: rgb(20, 102, 184); "|'''Time Stopper''' |
| − | | style="text-align: center; width: 120px; background-color: rgb(198, 226, 255); border-bottom-width: 1px; border-bottom-style: solid; border-bottom-color: rgb(20, 102, 184); "| |
+ | | style="text-align: center; width: 120px; background-color: rgb(198, 226, 255); border-bottom-width: 1px; border-bottom-style: solid; border-bottom-color: rgb(20, 102, 184); "|'''Atomic Fire''' |
| − | | style="width: 120px; text-align: center; background-color: rgb(198, 226, 255); border-bottom-width: 1px; border-bottom-style: solid; border-bottom-color: rgb(20, 102, 184); "| |
+ | | style="width: 120px; text-align: center; background-color: rgb(198, 226, 255); border-bottom-width: 1px; border-bottom-style: solid; border-bottom-color: rgb(20, 102, 184); "|'''Leaf Shield''' |
|- |
|- |
||
| − | | style="text-align: center; width: 120px; white-space: nowrap; background-color: rgb(224, 239, 255); border-right-width: 2px; border-right-style: solid; border-right-color: rgb(20, 102, 184); "| |
+ | | style="text-align: center; width: 120px; white-space: nowrap; background-color: rgb(224, 239, 255); border-right-width: 2px; border-right-style: solid; border-right-color: rgb(20, 102, 184); "|'''Normal''' |
| + | | style="text-align: center; background: #FCFCFC;"|1 |
||
| − | | style="text-align: center; background-image: initial; background-attachment: initial; background-origin: initial; background-clip: initial; background-color: rgb(252, 252, 252); background-position: initial initial; background-repeat: initial initial; "|<font color=black>1</font> |
||
| + | | style="text-align: center; background: #FCFCFC;"|0 |
||
| − | | style="text-align: center; background-image: initial; background-attachment: initial; background-origin: initial; background-clip: initial; background-color: rgb(252, 252, 252); background-position: initial initial; background-repeat: initial initial; "|<font color=black>0</font> |
||
| + | | style="text-align: center; background: #FCFCFC;"|3 |
||
| − | | style="text-align: center; background-image: initial; background-attachment: initial; background-origin: initial; background-clip: initial; background-color: rgb(252, 252, 252); background-position: initial initial; background-repeat: initial initial; "|<font color=black>3</font> |
||
| + | | style="text-align: center; background: #FCFCFC;"|1 |
||
| − | | style="text-align: center; background-image: initial; background-attachment: initial; background-origin: initial; background-clip: initial; background-color: rgb(252, 252, 252); background-position: initial initial; background-repeat: initial initial; "|<font color=black>1</font> |
||
| + | | style="text-align: center; background: #FCFCFC;"|0 |
||
| − | | style="text-align: center; background-image: initial; background-attachment: initial; background-origin: initial; background-clip: initial; background-color: rgb(252, 252, 252); background-position: initial initial; background-repeat: initial initial; "|<font color=black>0 </font> |
||
| + | | style="text-align: center; background: #FCFCFC;"|1:3:3 |
||
| − | | style="text-align: center; background-image: initial; background-attachment: initial; background-origin: initial; background-clip: initial; background-color: rgb(252, 252, 252); background-position: initial initial; background-repeat: initial initial; "|<font color=black>1:3:3</font> |
||
| + | | style="text-align: center; background: #FCFCFC;"|0 |
||
| − | | style="text-align: center; background-image: initial; background-attachment: initial; background-origin: initial; background-clip: initial; background-color: rgb(252, 252, 252); background-position: initial initial; background-repeat: initial initial; "|<font color=black>0 </font> |
||
|- |
|- |
||
| − | | style="text-align: center; width: 120px; white-space: nowrap; background-color: rgb(224, 239, 255); border-right-width: 2px; border-right-style: solid; border-right-color: rgb(20, 102, 184); "| |
+ | | style="text-align: center; width: 120px; white-space: nowrap; background-color: rgb(224, 239, 255); border-right-width: 2px; border-right-style: solid; border-right-color: rgb(20, 102, 184); "|'''Dificil''' |
| + | | style="text-align: center; background: #FCFCFC;"|1 |
||
| − | | style="text-align: center; background-image: initial; background-attachment: initial; background-origin: initial; background-clip: initial; background-color: rgb(252, 252, 252); background-position: initial initial; background-repeat: initial initial; "|<font color=black>1 </font> |
||
| + | | style="text-align: center; background: #FCFCFC;"|1 |
||
| − | | style="text-align: center; background-image: initial; background-attachment: initial; background-origin: initial; background-clip: initial; background-color: rgb(252, 252, 252); background-position: initial initial; background-repeat: initial initial; "|<font color=black>1</font> |
||
| + | | style="text-align: center; background: #FCFCFC;"|0 |
||
| − | | style="text-align: center; background-image: initial; background-attachment: initial; background-origin: initial; background-clip: initial; background-color: rgb(252, 252, 252); background-position: initial initial; background-repeat: initial initial; "|<font color=black>0</font> |
||
| + | | style="text-align: center; background: #FCFCFC;"|3 |
||
| − | | style="text-align: center; background-image: initial; background-attachment: initial; background-origin: initial; background-clip: initial; background-color: rgb(252, 252, 252); background-position: initial initial; background-repeat: initial initial; "|<font color=black>3</font> |
||
| + | | style="text-align: center; background: #FCFCFC;"|1 |
||
| − | | style="text-align: center; background-image: initial; background-attachment: initial; background-origin: initial; background-clip: initial; background-color: rgb(252, 252, 252); background-position: initial initial; background-repeat: initial initial; "|<font color=black>1</font> |
||
| + | | style="text-align: center; background: #FCFCFC;"|1 |
||
| − | | style="text-align: center; background-image: initial; background-attachment: initial; background-origin: initial; background-clip: initial; background-color: rgb(252, 252, 252); background-position: initial initial; background-repeat: initial initial; "|<font color=black>1</font> |
||
| + | | style="text-align: center; background: #FCFCFC;"|0 |
||
| − | | style="text-align: center; background-image: initial; background-attachment: initial; background-origin: initial; background-clip: initial; background-color: rgb(252, 252, 252); background-position: initial initial; background-repeat: initial initial; "|<font color=black>0 </font> |
||
| + | | style="text-align: center; background: #FCFCFC;"|1:3:3 |
||
| − | | style="text-align: center; background-image: initial; background-attachment: initial; background-origin: initial; background-clip: initial; background-color: rgb(252, 252, 252); background-position: initial initial; background-repeat: initial initial; "|<font color=black>1:3:3</font> |
||
| + | | style="text-align: center; background: #FCFCFC;"|0 |
||
| − | | style="text-align: center; background-image: initial; background-attachment: initial; background-origin: initial; background-clip: initial; background-color: rgb(252, 252, 252); background-position: initial initial; background-repeat: initial initial; "|<font color=black>0 </font> |
||
| ⚫ | |||
| + | {| align="center" cellpadding="3" cellspacing="1" style="width: 656px; line-height: normal; font-size: 12px; background-color: rgb(20, 102, 184); " |
||
| + | ! colspan="12" style="font-size: 16px; color: white; background-color: rgb(20, 102, 184); "|'''Mega Man: The Wily Wars''' |
||
| + | |- |
||
| + | | style="text-align: center; width: 120px; border-bottom-width: 1px; border-bottom-style: solid; border-bottom-color: rgb(20, 102, 184); background-color: rgb(198, 226, 255); "|'''Plasma Cannon''' |
||
| + | | style="text-align: center; width: 120px; border-bottom-width: 1px; border-bottom-style: solid; border-bottom-color: rgb(20, 102, 184); background-color: rgb(198, 226, 255); "|'''Metal Blade''' |
||
| + | | style="text-align: center; width: 120px; border-bottom-width: 1px; border-bottom-style: solid; border-bottom-color: rgb(20, 102, 184); background-color: rgb(198, 226, 255); "|'''Air Shooter''' |
||
| + | | style="text-align: center; width: 120px; border-bottom-width: 1px; border-bottom-style: solid; border-bottom-color: rgb(20, 102, 184); background-color: rgb(198, 226, 255); "|'''Bubble Lead''' |
||
| + | | style="text-align: center; width: 120px; border-bottom-width: 1px; border-bottom-style: solid; border-bottom-color: rgb(20, 102, 184); background-color: rgb(198, 226, 255); "|'''Quick Boomerang''' |
||
| + | | style="text-align: center; width: 120px; border-bottom-width: 1px; border-bottom-style: solid; border-bottom-color: rgb(20, 102, 184); background-color: rgb(198, 226, 255); "|'''Crash Bomber''' |
||
| + | | style="text-align: center; width: 120px; border-bottom-width: 1px; border-bottom-style: solid; border-bottom-color: rgb(20, 102, 184); background-color: rgb(198, 226, 255); "|'''Time Stopper''' |
||
| + | | style="text-align: center; width: 120px; border-bottom-width: 1px; border-bottom-style: solid; border-bottom-color: rgb(20, 102, 184); background-color: rgb(198, 226, 255); "|'''Atomic Fire''' |
||
| + | | style="text-align: center; width: 120px; border-bottom-width: 1px; border-bottom-style: solid; border-bottom-color: rgb(20, 102, 184); background-color: rgb(198, 226, 255); "|'''Leaf Shield''' |
||
| + | |- |
||
| + | | style="text-align: center; background: #FCFCFC;"|1 |
||
| + | | style="text-align: center; background: #FCFCFC;"|1 |
||
| + | | style="text-align: center; background: #FCFCFC;"|0 |
||
| + | | style="text-align: center; background: #FCFCFC;"|3 |
||
| + | | style="text-align: center; background: #FCFCFC;"|1 |
||
| + | | style="text-align: center; background: #FCFCFC;"|1 |
||
| + | | style="text-align: center; background: #FCFCFC;"|0 |
||
| + | | style="text-align: center; background: #FCFCFC;"|1:3:3 |
||
| + | | style="text-align: center; background: #FCFCFC;"|0 |
||
|} |
|} |
||
|} |
|} |
||
| − | ''*Para [[Atomic Fire]]: el primer digito es para el disparo estandar, el segundo para la carga media y el tercero es para la carga completa.'' |
||
| − | == |
+ | ==Curiosidades== |
| + | *Picopico-Kun, deviene de 2 vocables: "piko" es la [http://es.wikipedia.org/wiki/Onomatopeya onomatopeya] japonesa para el sonido que hacen las computadoras; "Kun" es el sufijo japonés para designar a un "subordinado". |
||
| − | *Picopico-kun, se puede deducir de que pico es una onomatopeya japonesa, mientras que "kun" significa "amigo" o "respetado". |
||
[[Archivo:MMWRPicoPico.png|right]] |
[[Archivo:MMWRPicoPico.png|right]] |
||
| − | * |
+ | *Hay datos no usados en la ROM de [[Mega Man: Dr. Wily's Revenge]], que muestran al Block Phoenix Creature, aunque aparece junto a los datos de los enemigos (sugiriendo que iba a ser uno de ellos) y es llamado solamente '''Pico Pico'''. |
| + | *Su nombre Phoenix se traduce como fénix y este fue dado porque al morir vuelve a aparecer otro bloque a remplazarlo aparentando que a "resucitado". |
||
| − | == |
+ | ==Vídeos== |
{|border="0" cellspacing="4" |
{|border="0" cellspacing="4" |
||
| − | !'''<big>Mega Man 2 ~ |
+ | !'''<big>Mega Man 2 ~ Block Phoenix Creature</big>''' |
! |
! |
||
| + | !'''<big>Mega Man: The Wily Wars ~ Block Phoenix Creature</big>''' |
||
| − | ! |
||
|- |
|- |
||
| − | |[[ |
+ | |[[Archivo:Mega Man 2 - Wily's Fortress Stage 2|thumb|right|290px|Vídeo del Escenario del Dr. Wily 2 en Mega Man 2, NES.]] |
| |
| |
||
| + | |[[Archivo:The Wily Wars Mega Man 2- Dr. Wily Stage 2- No Damage|thumb|right|290px|Vídeo del Escenario del Dr. Wily 2 en Mega Man: The Wily Wars (Mega Man 2), Sega Genesis.]] |
||
| ⚫ | |||
|} |
|} |
||
{{Plantilla:Megaman2}} |
{{Plantilla:Megaman2}} |
||
| − | [[Categoría:Jefes de |
+ | [[Categoría:Jefes Especiales de la Saga Clásica]] |
[[Categoría:Sistema de Seguridad]] |
[[Categoría:Sistema de Seguridad]] |
||
| − | [[Categoría: |
+ | [[Categoría:Jefes de Fortaleza]] |
| + | [[Categoría:Robots creados por el Dr. Light]] |
||
[[Categoría:Jefes de Mega Man 2]] |
[[Categoría:Jefes de Mega Man 2]] |
||
| − | [[Categoría:Enemigos sin usar de Mega Man: Dr. Wily's Revenge]] |
||
Revisión del 15:00 30 abr 2017
Block Phoenix Creature, conocido en Japón como Picopico-Kun (ピコピコくん Pikopiko-kun?), es un robot disfrazado como un sistema de seguridad que el Dr. Light usaba en su propio laboratorio. El Dr. Wily lo encontró aparentemente mientras trataba de infiltrarse en el laboratorio del Dr. Light, en algún momento del pasado, e impresionado por su fuerza lo incorporó posteriormente a su fortaleza.
En "Mega Man 2", Block Phoenix Creature es el Jefe de Fortaleza del 2º Wily Castillo (Mega Man 2); son en sí 8 robots que atacan consecutivamente.
Apariciones y Estrategias
Mega Man 2
| |||||||||||||||||||||||||||||||||||||||||||

Estrategia: Una vez que has caído dentro de la habitación de batalla, 2 paneles se moveran en un intento de ensamblarse, así se formará el 1º Block Phoenix Creature (si quedas atrapado en medio del ensamble, "morirás"), Block Phoenix Creature se dedicá a seguirte y golpearte a una velocidad relativamente lenta. Utiliza el Bubble Lead, 1 de las burbujas destruye automáticamente a 1 Block Phoenix Creature. Posteriormente, otros 2 paneles se desplazarán formando un 2º Block Phoenix Creature, el cual poseé cierto aumento de velocidad; esto proseguirá hasta el 8º y último Block Phoenix Creature, que es el más rápido de la serie. Haz uso del Bubble Lead en todos ellos.
| Cartilla de Daño | |||||
|---|---|---|---|---|---|
| P | 1:1 | M | 1:1 | A | 0:0 |
| B | 3:3 | Q | 1:1 | C | 1:1 |
| F | 0:0 | H | 1:3:3 1:3:3 |
W | 0:0 |
| Nota: | Para cada arma, el primer dígito es el daño recibido en el "MODO NORMAL"; el segundo dígito, es el "MODO DIFÍCIL". | ||||
Mega Man: The Wily Wars

Block Phoenix Creature vs. Mega Man, Mega Man: The Wily Wars.
Estrategia: Una vez que has caído dentro de la habitación de batalla, 2 paneles se moveran en un intento de ensamblarse, así se formará el 1º Block Phoenix Creature (si quedas atrapado en medio del ensamble, "morirás"), Block Phoenix Creature se dedicá a seguirte y golpearte a una velocidad relativamente lenta. Utiliza el Bubble Lead, 1 de las burbujas destruye automáticamente a 1 Creature. Posteriormente, otros 2 paneles se desplazarán formando un 2º Block Phoenix Creature, el cual poseé cierto aumento de velocidad; esto proseguirá hasta el 8º y último Block Phoenix Creature, que es el más rápido de la serie. Haz uso del Bubble Lead en todos ellos.
Datos
Datos en Rockman Complete Works
| ROCKMAN 2 | ||||||
| ||||||
| No. | 37 | Nombre | ピコピコくん (Picopico-Kun) | |||
| Dato | もともと、ライトはかせのいえのガードシステムだったものをワイリーが悪用した。安全な場所をうまくりようしてたおそう。 | |||||
| Traducción | Originalmente, era un sistema de seguridad para la casa del Doctor Right pero fue robado por Wily. Busca un lugar seguro y atácalo. | |||||
| HP | 28 | AT | 08 | |||
Datos en Mega Man Legacy Collection
| MEGA MAN LEGACY COLLECTION (Mega Man 2) | ||||||

| ||||||
| Nombre | Picopico-Kun | |||||
| Dato | Originalmente era un sistema de seguridad en la casa del Dr. Light, pero el Dr. Wily lo remodeló para que fuera malvado. Busca un lugar seguro y elimínalo desde allí. | |||||
| HP | 28 | AT | 08 | |||
Datos de Escenario
Enemigos de Escenario
| Enemigos del 2° Wily Castillo en Mega Man 2 | |||||||
|---|---|---|---|---|---|---|---|
| |||||||
| |||||||
| |||||||
| |||||||
| Trampas del 2° Wily Castillo en Mega Man 2 | |||||||
|---|---|---|---|---|---|---|---|
| |||||||
| |||||||
| |||||||
Cartilla de Daño
Valores de daño que recibe Block Phoenix Creature de cada Arma Especial en Mega Man 2, Mega Man: The Wily Wars.
| ||||||||||||||||||||||||||||||||||||||||||||||||||||||||||||||||||||||||
Curiosidades
- Picopico-Kun, deviene de 2 vocables: "piko" es la onomatopeya japonesa para el sonido que hacen las computadoras; "Kun" es el sufijo japonés para designar a un "subordinado".
- Hay datos no usados en la ROM de Mega Man: Dr. Wily's Revenge, que muestran al Block Phoenix Creature, aunque aparece junto a los datos de los enemigos (sugiriendo que iba a ser uno de ellos) y es llamado solamente Pico Pico.
- Su nombre Phoenix se traduce como fénix y este fue dado porque al morir vuelve a aparecer otro bloque a remplazarlo aparentando que a "resucitado".
Vídeos

