Etiqueta: rte-wysiwyg |
Etiqueta: rte-wysiwyg |
||
| (No se muestran 13 ediciones intermedias del mismo usuario) | |||
| Línea 61: | Línea 61: | ||
El armamento de '''Mega Mech Shark''' varía en cada fase, y el daño que infringen es de '''4''' a '''5''' de '''HP''' (del jugador). Además de que este armamento són los puntos débiles de '''Mega Mech Shark'''.''' ''' {{TablaEnemigos |
El armamento de '''Mega Mech Shark''' varía en cada fase, y el daño que infringen es de '''4''' a '''5''' de '''HP''' (del jugador). Además de que este armamento són los puntos débiles de '''Mega Mech Shark'''.''' ''' {{TablaEnemigos |
||
|Nombre de tabla = Enemigos que acompañan a Mega Mech Shark |
|Nombre de tabla = Enemigos que acompañan a Mega Mech Shark |
||
| − | |japones1 = |
+ | |japones1 = Misil |
|descripcion1 = Misiles que al ser lanzados, pueden perseguir al jugador para dañarlo. Pueden ser lanzados en un máximo de tres. Aparecen en la primera fase de [[Mega Mech Shark]], en un lanzamisil. |
|descripcion1 = Misiles que al ser lanzados, pueden perseguir al jugador para dañarlo. Pueden ser lanzados en un máximo de tres. Aparecen en la primera fase de [[Mega Mech Shark]], en un lanzamisil. |
||
|escenario1 = [[Wily_Castillo|Wily Castillo 2]], [[Fake Man]] (Special Stage). |
|escenario1 = [[Wily_Castillo|Wily Castillo 2]], [[Fake Man]] (Special Stage). |
||
| Línea 77: | Línea 77: | ||
|Nombre de tabla = Obstáculo de Mega Mech Shark |
|Nombre de tabla = Obstáculo de Mega Mech Shark |
||
|nombre1 = Picos |
|nombre1 = Picos |
||
| − | |descripcion1 = Estos [[Picos]] no |
+ | |descripcion1 = Estos [[Picos]] "no matan" instaneamente, pero si pueden dañar gravemente a [[Mega Man]]. Aparecen en la segunda fase de [[Mega Mech Shark]], debajo de su torso. |
| − | |escenario1 = [[Wily_Castillo|Wily Castillo 2]], [[Fake Man]] (Special Stage).|sprite1 = PicosMMSHSpriteMM9.png}}Los [[Picos]] que tiene '''Mega Mech Shark''' debajo de su torso, no matan instantaneamante, pero sí pueden infringir un grave daño al jugador. |
+ | |escenario1 = [[Wily_Castillo|Wily Castillo 2]], [[Fake Man]] (Special Stage).|sprite1 = PicosMMSHSpriteMM9.png}}Los [[Picos]] que tiene '''Mega Mech Shark''' debajo de su torso, "no matan" instantaneamante, pero sí pueden infringir un grave daño al jugador. |
{{-}} |
{{-}} |
||
| + | ==Datos de Escenario== |
||
| + | {{Plantilla:Escenarios |
||
| + | |juego = Mega Man 9 |
||
| + | |Titulo = [[Wily_Castillo|Wily Castilo 2]] |
||
| + | |BD = 2° escenario del [[Wily Castillo]] con abundantes [[Picos]] en cada sector, y una profunda zona acuátia. En este escenario aparece por segunda vez [[Hanabiran]] un '''Sub-Jefe''' del escenario de [[Hornet Man]].|Imagen = WilyCastle2MM9.png |
||
| + | |retrato = RecuadroWilyCastle2MM9.png|Mapa = Wilycastillomapa2MM9.png}} |
||
| + | {{-}} |
||
| + | |||
| + | ==Cartilla de Daño== |
||
| + | Valores de daño que recibe cada una de las fases de '''Mega Mech Shark''', de cada arma especial en [[Mega Man 9]]. |
||
| + | {| align="center" cellpadding="3" cellspacing="1" style="color: rgb(5, 5, 5); background-color: rgb(20, 102, 184); width: 656px; line-height: normal; font-size: 12px; border-top-left-radius: 5px; border-top-right-radius: 5px; border-bottom-right-radius: 5px; border-bottom-left-radius: 5px; border-top-width: 2px; border-right-width: 2px; border-bottom-width: 2px; border-left-width: 2px; border-top-style: solid; border-right-style: solid; border-bottom-style: solid; border-left-style: solid; border-top-color: rgb(20, 102, 184); border-right-color: rgb(20, 102, 184); border-bottom-color: rgb(20, 102, 184); border-left-color: rgb(20, 102, 184); border-image: initial; " |
||
| + | ! colspan="12" style="font-size: 16px; color: white; "|'''Mega Mech Shark (Fase 1)''' |
||
| + | |- |
||
| + | | style="text-align: center; width: 120px; background-color: rgb(198, 226, 255); border-bottom-width: 1px; border-bottom-style: solid; border-bottom-color: rgb(20, 102, 184); "|'''Mega Buster''' |
||
| + | | style="text-align: center; width: 120px; background-color: rgb(198, 226, 255); border-bottom-width: 1px; border-bottom-style: solid; border-bottom-color: rgb(20, 102, 184); "|'''Proto Buster''' |
||
| + | | style="text-align: center; width: 120px; background-color: rgb(198, 226, 255); border-bottom-width: 1px; border-bottom-style: solid; border-bottom-color: rgb(20, 102, 184); "|'''Concrete Shot''' |
||
| + | | style="text-align: center; width: 120px; background-color: rgb(198, 226, 255); border-bottom-width: 1px; border-bottom-style: solid; border-bottom-color: rgb(20, 102, 184); "|'''Tornado Blow''' |
||
| + | | style="text-align: center; width: 120px; background-color: rgb(198, 226, 255); border-bottom-width: 1px; border-bottom-style: solid; border-bottom-color: rgb(20, 102, 184); "|'''Laser Trident''' |
||
| + | | style="text-align: center; width: 120px; background-color: rgb(198, 226, 255); border-bottom-width: 1px; border-bottom-style: solid; border-bottom-color: rgb(20, 102, 184); "|'''Plug Ball''' |
||
| + | | style="text-align: center; width: 120px; background-color: rgb(198, 226, 255); border-bottom-width: 1px; border-bottom-style: solid; border-bottom-color: rgb(20, 102, 184); "|'''Jewel Satellite''' |
||
| + | | style="text-align: center; width: 120px; background-color: rgb(198, 226, 255); border-bottom-width: 1px; border-bottom-style: solid; border-bottom-color: rgb(20, 102, 184); "|'''Hornet Chaser''' |
||
| + | | style="text-align: center; width: 120px; background-color: rgb(198, 226, 255); border-bottom-width: 1px; border-bottom-style: solid; border-bottom-color: rgb(20, 102, 184); "|'''Magma Bazooka''' |
||
| + | | style="text-align: center; width: 120px; background-color: rgb(198, 226, 255); border-bottom-width: 1px; border-bottom-style: solid; border-bottom-color: rgb(20, 102, 184); "|'''Black Hole Bomb''' |
||
| + | |- |
||
| + | | style="text-align: center; background-image: initial; background-attachment: initial; background-origin: initial; background-clip: initial; background-color: rgb(252, 252, 252); background-position: initial initial; background-repeat: initial initial; "|2 |
||
| + | | style="text-align: center; background-image: initial; background-attachment: initial; background-origin: initial; background-clip: initial; background-color: rgb(252, 252, 252); background-position: initial initial; background-repeat: initial initial; "|2:4* |
||
| + | | style="text-align: center; background-image: initial; background-attachment: initial; background-origin: initial; background-clip: initial; background-color: rgb(252, 252, 252); background-position: initial initial; background-repeat: initial initial; "|2 |
||
| + | | style="text-align: center; background-image: initial; background-attachment: initial; background-origin: initial; background-clip: initial; background-color: rgb(252, 252, 252); background-position: initial initial; background-repeat: initial initial; "|4 |
||
| + | | style="text-align: center; background-image: initial; background-attachment: initial; background-origin: initial; background-clip: initial; background-color: rgb(252, 252, 252); background-position: initial initial; background-repeat: initial initial; "|4 |
||
| + | | style="text-align: center; background-image: initial; background-attachment: initial; background-origin: initial; background-clip: initial; background-color: rgb(252, 252, 252); background-position: initial initial; background-repeat: initial initial; "|2 |
||
| + | | style="text-align: center; background-image: initial; background-attachment: initial; background-origin: initial; background-clip: initial; background-color: rgb(252, 252, 252); background-position: initial initial; background-repeat: initial initial; "|2 |
||
| + | | style="text-align: center; background-image: initial; background-attachment: initial; background-origin: initial; background-clip: initial; background-color: rgb(252, 252, 252); background-position: initial initial; background-repeat: initial initial; "|2 |
||
| + | | style="text-align: center; background-image: initial; background-attachment: initial; background-origin: initial; background-clip: initial; background-color: rgb(252, 252, 252); background-position: initial initial; background-repeat: initial initial; "|2:4* |
||
| + | | style="text-align: center; background-image: initial; background-attachment: initial; background-origin: initial; background-clip: initial; background-color: rgb(252, 252, 252); background-position: initial initial; background-repeat: initial initial; "|2 |
||
| + | |} |
||
| + | {| align="center" cellpadding="3" cellspacing="1" style="color: rgb(5, 5, 5); background-color: rgb(20, 102, 184); width: 656px; line-height: normal; font-size: 12px; border-top-left-radius: 5px; border-top-right-radius: 5px; border-bottom-right-radius: 5px; border-bottom-left-radius: 5px; border-top-width: 2px; border-right-width: 2px; border-bottom-width: 2px; border-left-width: 2px; border-top-style: solid; border-right-style: solid; border-bottom-style: solid; border-left-style: solid; border-top-color: rgb(20, 102, 184); border-right-color: rgb(20, 102, 184); border-bottom-color: rgb(20, 102, 184); border-left-color: rgb(20, 102, 184); border-image: initial; " |
||
| + | ! colspan="12" style="font-size: 16px; color: white; "|'''Mega Mech Shark (Fase 2)''' |
||
| + | |- |
||
| + | | style="text-align: center; width: 120px; background-color: rgb(198, 226, 255); border-bottom-width: 1px; border-bottom-style: solid; border-bottom-color: rgb(20, 102, 184); "|'''Mega Buster''' |
||
| + | | style="text-align: center; width: 120px; background-color: rgb(198, 226, 255); border-bottom-width: 1px; border-bottom-style: solid; border-bottom-color: rgb(20, 102, 184); "|'''Proto Buster''' |
||
| + | | style="text-align: center; width: 120px; background-color: rgb(198, 226, 255); border-bottom-width: 1px; border-bottom-style: solid; border-bottom-color: rgb(20, 102, 184); "|'''Concrete Shot''' |
||
| + | | style="text-align: center; width: 120px; background-color: rgb(198, 226, 255); border-bottom-width: 1px; border-bottom-style: solid; border-bottom-color: rgb(20, 102, 184); "|'''Tornado Blow''' |
||
| + | | style="text-align: center; width: 120px; background-color: rgb(198, 226, 255); border-bottom-width: 1px; border-bottom-style: solid; border-bottom-color: rgb(20, 102, 184); "|'''Laser Trident''' |
||
| + | | style="text-align: center; width: 120px; background-color: rgb(198, 226, 255); border-bottom-width: 1px; border-bottom-style: solid; border-bottom-color: rgb(20, 102, 184); "|'''Plug Ball''' |
||
| + | | style="text-align: center; width: 120px; background-color: rgb(198, 226, 255); border-bottom-width: 1px; border-bottom-style: solid; border-bottom-color: rgb(20, 102, 184); "|'''Jewel Satellite''' |
||
| + | | style="text-align: center; width: 120px; background-color: rgb(198, 226, 255); border-bottom-width: 1px; border-bottom-style: solid; border-bottom-color: rgb(20, 102, 184); "|'''Hornet Chaser''' |
||
| + | | style="text-align: center; width: 120px; background-color: rgb(198, 226, 255); border-bottom-width: 1px; border-bottom-style: solid; border-bottom-color: rgb(20, 102, 184); "|'''Magma Bazooka''' |
||
| + | | style="text-align: center; width: 120px; background-color: rgb(198, 226, 255); border-bottom-width: 1px; border-bottom-style: solid; border-bottom-color: rgb(20, 102, 184); "|'''Black Hole Bomb''' |
||
| + | |- |
||
| + | | style="text-align: center; background-image: initial; background-attachment: initial; background-origin: initial; background-clip: initial; background-color: rgb(252, 252, 252); background-position: initial initial; background-repeat: initial initial; "|2 |
||
| + | | style="text-align: center; background-image: initial; background-attachment: initial; background-origin: initial; background-clip: initial; background-color: rgb(252, 252, 252); background-position: initial initial; background-repeat: initial initial; "|2:4* |
||
| + | | style="text-align: center; background-image: initial; background-attachment: initial; background-origin: initial; background-clip: initial; background-color: rgb(252, 252, 252); background-position: initial initial; background-repeat: initial initial; "|2 |
||
| + | | style="text-align: center; background-image: initial; background-attachment: initial; background-origin: initial; background-clip: initial; background-color: rgb(252, 252, 252); background-position: initial initial; background-repeat: initial initial; "|4 |
||
| + | | style="text-align: center; background-image: initial; background-attachment: initial; background-origin: initial; background-clip: initial; background-color: rgb(252, 252, 252); background-position: initial initial; background-repeat: initial initial; "|4 |
||
| + | | style="text-align: center; background-image: initial; background-attachment: initial; background-origin: initial; background-clip: initial; background-color: rgb(252, 252, 252); background-position: initial initial; background-repeat: initial initial; "|2 |
||
| + | | style="text-align: center; background-image: initial; background-attachment: initial; background-origin: initial; background-clip: initial; background-color: rgb(252, 252, 252); background-position: initial initial; background-repeat: initial initial; "|2 |
||
| + | | style="text-align: center; background-image: initial; background-attachment: initial; background-origin: initial; background-clip: initial; background-color: rgb(252, 252, 252); background-position: initial initial; background-repeat: initial initial; "|2 |
||
| + | | style="text-align: center; background-image: initial; background-attachment: initial; background-origin: initial; background-clip: initial; background-color: rgb(252, 252, 252); background-position: initial initial; background-repeat: initial initial; "|2:4* |
||
| + | | style="text-align: center; background-image: initial; background-attachment: initial; background-origin: initial; background-clip: initial; background-color: rgb(252, 252, 252); background-position: initial initial; background-repeat: initial initial; "|2 |
||
| + | |} |
||
| + | {| align="center" cellpadding="3" cellspacing="1" style="color: rgb(5, 5, 5); background-color: rgb(20, 102, 184); width: 656px; line-height: normal; font-size: 12px; border-top-left-radius: 5px; border-top-right-radius: 5px; border-bottom-right-radius: 5px; border-bottom-left-radius: 5px; border-top-width: 2px; border-right-width: 2px; border-bottom-width: 2px; border-left-width: 2px; border-top-style: solid; border-right-style: solid; border-bottom-style: solid; border-left-style: solid; border-top-color: rgb(20, 102, 184); border-right-color: rgb(20, 102, 184); border-bottom-color: rgb(20, 102, 184); border-left-color: rgb(20, 102, 184); border-image: initial; " |
||
| + | ! colspan="12" style="font-size: 16px; color: white; "|'''Mega Mech Shark (Fase 3)''' |
||
| + | |- |
||
| + | | style="text-align: center; width: 120px; background-color: rgb(198, 226, 255); border-bottom-width: 1px; border-bottom-style: solid; border-bottom-color: rgb(20, 102, 184); "|'''Mega Buster''' |
||
| + | | style="text-align: center; width: 120px; background-color: rgb(198, 226, 255); border-bottom-width: 1px; border-bottom-style: solid; border-bottom-color: rgb(20, 102, 184); "|'''Proto Buster''' |
||
| + | | style="text-align: center; width: 120px; background-color: rgb(198, 226, 255); border-bottom-width: 1px; border-bottom-style: solid; border-bottom-color: rgb(20, 102, 184); "|'''Concrete Shot''' |
||
| + | | style="text-align: center; width: 120px; background-color: rgb(198, 226, 255); border-bottom-width: 1px; border-bottom-style: solid; border-bottom-color: rgb(20, 102, 184); "|'''Tornado Blow''' |
||
| + | | style="text-align: center; width: 120px; background-color: rgb(198, 226, 255); border-bottom-width: 1px; border-bottom-style: solid; border-bottom-color: rgb(20, 102, 184); "|'''Laser Trident''' |
||
| + | | style="text-align: center; width: 120px; background-color: rgb(198, 226, 255); border-bottom-width: 1px; border-bottom-style: solid; border-bottom-color: rgb(20, 102, 184); "|'''Plug Ball''' |
||
| + | | style="text-align: center; width: 120px; background-color: rgb(198, 226, 255); border-bottom-width: 1px; border-bottom-style: solid; border-bottom-color: rgb(20, 102, 184); "|'''Jewel Satellite''' |
||
| + | | style="text-align: center; width: 120px; background-color: rgb(198, 226, 255); border-bottom-width: 1px; border-bottom-style: solid; border-bottom-color: rgb(20, 102, 184); "|'''Hornet Chaser''' |
||
| + | | style="text-align: center; width: 120px; background-color: rgb(198, 226, 255); border-bottom-width: 1px; border-bottom-style: solid; border-bottom-color: rgb(20, 102, 184); "|'''Magma Bazooka''' |
||
| + | | style="text-align: center; width: 120px; background-color: rgb(198, 226, 255); border-bottom-width: 1px; border-bottom-style: solid; border-bottom-color: rgb(20, 102, 184); "|'''Black Hole Bomb''' |
||
| + | |- |
||
| + | | style="text-align: center; background-image: initial; background-attachment: initial; background-origin: initial; background-clip: initial; background-color: rgb(252, 252, 252); background-position: initial initial; background-repeat: initial initial; "|2 |
||
| + | | style="text-align: center; background-image: initial; background-attachment: initial; background-origin: initial; background-clip: initial; background-color: rgb(252, 252, 252); background-position: initial initial; background-repeat: initial initial; "|2:4* |
||
| + | | style="text-align: center; background-image: initial; background-attachment: initial; background-origin: initial; background-clip: initial; background-color: rgb(252, 252, 252); background-position: initial initial; background-repeat: initial initial; "|2 |
||
| + | | style="text-align: center; background-image: initial; background-attachment: initial; background-origin: initial; background-clip: initial; background-color: rgb(252, 252, 252); background-position: initial initial; background-repeat: initial initial; "|4 |
||
| + | | style="text-align: center; background-image: initial; background-attachment: initial; background-origin: initial; background-clip: initial; background-color: rgb(252, 252, 252); background-position: initial initial; background-repeat: initial initial; "|4 |
||
| + | | style="text-align: center; background-image: initial; background-attachment: initial; background-origin: initial; background-clip: initial; background-color: rgb(252, 252, 252); background-position: initial initial; background-repeat: initial initial; "|2 |
||
| + | | style="text-align: center; background-image: initial; background-attachment: initial; background-origin: initial; background-clip: initial; background-color: rgb(252, 252, 252); background-position: initial initial; background-repeat: initial initial; "|2 |
||
| + | | style="text-align: center; background-image: initial; background-attachment: initial; background-origin: initial; background-clip: initial; background-color: rgb(252, 252, 252); background-position: initial initial; background-repeat: initial initial; "|2 |
||
| + | | style="text-align: center; background-image: initial; background-attachment: initial; background-origin: initial; background-clip: initial; background-color: rgb(252, 252, 252); background-position: initial initial; background-repeat: initial initial; "|2:4* |
||
| + | | style="text-align: center; background-image: initial; background-attachment: initial; background-origin: initial; background-clip: initial; background-color: rgb(252, 252, 252); background-position: initial initial; background-repeat: initial initial; "|2 |
||
| + | |} |
||
| + | (*) Los dos dígitos de daño que aparecen en las armas, hacen referencia a: |
||
| + | |||
| + | "'''Disparo normal : Disparo Cargado'''". |
||
| + | |||
| + | Notaremos que los valores de daño que recibe cada fase de '''Mega Mech Shark''' no presentan ningún tipo de cámbio. Esto es debido a que el '''jefe''' que estamos enfrentando es el mismo, pero en diferentes partes de su cuerpo. |
||
| + | {{-}} |
||
| + | |||
==Estrategia== |
==Estrategia== |
||
===Escenario del [[Wily Castillo]]=== |
===Escenario del [[Wily Castillo]]=== |
||
| + | [[Archivo:FasesMMSHWilyCastle2PriteMM92.png|thumb|right|333px|Gráfico completo de '''Mega Mech Shark''' con sus Fases en el escenario.]] |
||
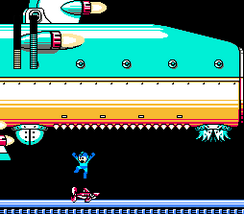
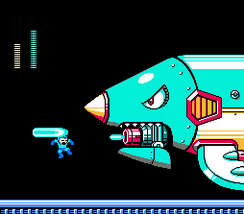
Aparece como '''jefe''' del [[Wily_Castillo|Wily Castillo 2]]. [[Mega Man]] pása por la '''puerta del jefe''' que está en el extremo izquierdo de la pantalla, como si estuviese retrocediendo. Pása por una zona oscura y abierta del escenario. Se encuentra con [[Mega Mech Shark]]. Este '''jefe''' es muy grande, y no cabe en toda la pantalla, por lo que está dividida en tres fases, empezando por su parte trasera hasta su parte frontal. Sus movimientos son sólo levitar en el aire, por lo que en todas sus fases se la pasa levitando (arriba y abajo). |
Aparece como '''jefe''' del [[Wily_Castillo|Wily Castillo 2]]. [[Mega Man]] pása por la '''puerta del jefe''' que está en el extremo izquierdo de la pantalla, como si estuviese retrocediendo. Pása por una zona oscura y abierta del escenario. Se encuentra con [[Mega Mech Shark]]. Este '''jefe''' es muy grande, y no cabe en toda la pantalla, por lo que está dividida en tres fases, empezando por su parte trasera hasta su parte frontal. Sus movimientos son sólo levitar en el aire, por lo que en todas sus fases se la pasa levitando (arriba y abajo). |
||
====Fase 1==== |
====Fase 1==== |
||
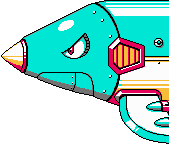
| + | [[Archivo:MMSHFase1WC2MM9.png|thumb|left|244px|[[Mega Man]] contra la Fase 1 de '''Mega Mech Shark'''.]] |
||
'''Cola:''' La primera parte de '''Mega Mech Shark'''. Tiene un '''lanzamisiles''' en su cola, es ahí donde el jugador debe disparar, pero sólo cuando se abre para lanzar sus misiles. Lanza 3 de ellos que van dirección al jugador para dañarlo (puedes disparles con el [[Mega Buster]] para destruirlos). El [[Laser Trident]] Puede vencer fácilmente a esta primera fase. |
'''Cola:''' La primera parte de '''Mega Mech Shark'''. Tiene un '''lanzamisiles''' en su cola, es ahí donde el jugador debe disparar, pero sólo cuando se abre para lanzar sus misiles. Lanza 3 de ellos que van dirección al jugador para dañarlo (puedes disparles con el [[Mega Buster]] para destruirlos). El [[Laser Trident]] Puede vencer fácilmente a esta primera fase. |
||
| + | {{-}} |
||
====Fase 2==== |
====Fase 2==== |
||
| + | [[Archivo:MMSHFase2WC2MM9.png|thumb|244px|[[Mega Man]] contra la Fase 2 de '''Mega Mech Shark'''.]] |
||
'''Torso:''' La segunda parte de '''Mega Mech Shark'''. [[Mega Man]] avanza en el escenario abierto del '''jefe''' y se detiene debajo de su '''torso'''. Esta segunda fase tiene dos '''cápsulas''' que fabrican '''Small Sharks''' (pequeños robot tiburones), y en medio [[Picos]], que "no matan", pero sí pueden dañar al jugador. El punto débil de esta fase, són las '''cápsulas''', puedes dispararles para infingir daño en él, pero ten en cuenta que mientras levita, el salto se te dificultará aun más, por los picos que están encima de ti, y cuando éstas cápsulas lanzen sus '''Small Sharks''' para embestirte, pero puedes disparles utilizando el [[Mega Buster]], sin necesidad de esquivarlos saltando (aunque debes tener buenos reflejos al realizar dicha accíon). O el [[Tornado Blow]] que no sólo es la debilidad de éste pequeño enemigo tiburón, sino también de ésta segunda fase. |
'''Torso:''' La segunda parte de '''Mega Mech Shark'''. [[Mega Man]] avanza en el escenario abierto del '''jefe''' y se detiene debajo de su '''torso'''. Esta segunda fase tiene dos '''cápsulas''' que fabrican '''Small Sharks''' (pequeños robot tiburones), y en medio [[Picos]], que "no matan", pero sí pueden dañar al jugador. El punto débil de esta fase, són las '''cápsulas''', puedes dispararles para infingir daño en él, pero ten en cuenta que mientras levita, el salto se te dificultará aun más, por los picos que están encima de ti, y cuando éstas cápsulas lanzen sus '''Small Sharks''' para embestirte, pero puedes disparles utilizando el [[Mega Buster]], sin necesidad de esquivarlos saltando (aunque debes tener buenos reflejos al realizar dicha accíon). O el [[Tornado Blow]] que no sólo es la debilidad de éste pequeño enemigo tiburón, sino también de ésta segunda fase. |
||
| + | {{-}} |
||
====Fase 3==== |
====Fase 3==== |
||
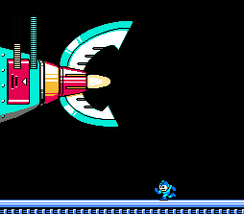
| + | [[Archivo:MMSHFase3WC2MM9.png|thumb|left|244px|[[Mega Man]] contra la Fase 3 de '''Mega Mech Shark'''.]] |
||
'''Cabeza:''' La tercera y última parte de '''Mega Mech Shark'''. [[Mega Man]] avanza en el escenario abierto del '''jefe''' y se detiene en su '''cabeza'''. Tiene un '''cañón''' instalado en su mandíbula que puede lanzar grandes rayos laser al jugador para dañarlo. Puedes esquivarlo mientras caminas o saltando (si éste '''jefe''' se encuentra a una altura baja). El [[Laser Trident]] puede vencer fácilmente a ésta última fase. |
'''Cabeza:''' La tercera y última parte de '''Mega Mech Shark'''. [[Mega Man]] avanza en el escenario abierto del '''jefe''' y se detiene en su '''cabeza'''. Tiene un '''cañón''' instalado en su mandíbula que puede lanzar grandes rayos laser al jugador para dañarlo. Puedes esquivarlo mientras caminas o saltando (si éste '''jefe''' se encuentra a una altura baja). El [[Laser Trident]] puede vencer fácilmente a ésta última fase. |
||
{{-}} |
{{-}} |
||
===Escenario de [[Fake Man]] (Special Stage)=== |
===Escenario de [[Fake Man]] (Special Stage)=== |
||
| + | [[Archivo:FasesMMSHSSpecialStagePriteMM92.png|thumb|333px|Gráfico completo de '''Mega Mech Shark''' con sus Fases en el escenario.]] |
||
Aparece como '''Sub-Jefe''' en el '''Escenario Especial''', antes de llegar a [[Fake Man]]. [[Mega Man]] camina hacia el extremo izquierdo de la pantalla, y pása por una zona oscura y abierta del escenario. Se encuentra con '''Mega mech shark'''. Sus fases son las mismas que en escenario del [[Wily_Castillo|Wily Castillo 2]], al igual que su patrón de ataque, y debilidades. |
Aparece como '''Sub-Jefe''' en el '''Escenario Especial''', antes de llegar a [[Fake Man]]. [[Mega Man]] camina hacia el extremo izquierdo de la pantalla, y pása por una zona oscura y abierta del escenario. Se encuentra con '''Mega mech shark'''. Sus fases son las mismas que en escenario del [[Wily_Castillo|Wily Castillo 2]], al igual que su patrón de ataque, y debilidades. |
||
| + | {{-}} |
||
| + | ==Curiosidades== |
||
| + | *'''Mega Mech Shark''' tiene un cierto parecido a '''U-555''', un '''Sub-Jefe''' de [[Mega Man X5]] que aparece en el escenario de [[Duff McWhalen]]. Que también se divide en 3 fases, pero en diferente órden, ya que primero lo enfrentamos con su '''cabeza''', luego con su '''cola''' y por último su '''torso'''. |
||
| + | {{Megaman9}} |
||
[[Categoría:Jefes de Mega Man 9]] |
[[Categoría:Jefes de Mega Man 9]] |
||
[[Categoría:Sub-Jefes de Mega Man 9]] |
[[Categoría:Sub-Jefes de Mega Man 9]] |
||
Revisión actual - 17:10 25 oct 2016
Mega Mech Shark (メガメックシャーク Mega Mekku Shāku?), es un Jefe tipo Tiburón gigante de Mega Man 9 que aparece en el escenario del Wily Castillo 2. También aparece como Sub-Jefe en el Escenario Especial de Fake Man. Es un gigantesco robot en forma de tiburón construido para la batalla, con propulsores en sus aletas y torso, y uno grande en su cola que le permite volar y/o levitar en el aire. Además de portar armamento en su cuerpo que servirán para dañar gravemente al jugador. Su cuerpo es tan grande, que no cabe en toda la pantalla, por lo que está dividida en 3 fases:
| Fases de Mega Mech Shark | |||||||||
|---|---|---|---|---|---|---|---|---|---|
| |||||||||
| |||||||||
| |||||||||


Cada una de estas fases són las partes del cuerpo de este gigantesco jefe con diferente armamento en cada uno, por lo que su patrón de ataque es diferente. Estas fases no comparten una misma barra de vitalidad, por lo que cada fase tiene su respectiva barra.
| Armamento de Mega Mech Shark | |||||||||
|---|---|---|---|---|---|---|---|---|---|
| |||||||||
| |||||||||
| |||||||||
El armamento de Mega Mech Shark varía en cada fase, y el daño que infringen es de 4 a 5 de HP (del jugador). Además de que este armamento són los puntos débiles de Mega Mech Shark.
| Enemigos que acompañan a Mega Mech Shark | |||||||||
|---|---|---|---|---|---|---|---|---|---|
| |||||||||
| |||||||||
Los enemigos que acompañan a Mega Mech Shark, los fabrica él mismo, a través del armamento que tiene en su cuerpo.
| Obstáculo de Mega Mech Shark | |||||||
|---|---|---|---|---|---|---|---|
| |||||||
Los Picos que tiene Mega Mech Shark debajo de su torso, "no matan" instantaneamante, pero sí pueden infringir un grave daño al jugador.
Datos de Escenario
| Información del Escenario |
|---|
|
Recuadro | Videojuego | Mega Man 9 | |
| Título | Wily Castilo 2 | |||
| Breve Descripción | ||||
| 2° escenario del Wily Castillo con abundantes Picos en cada sector, y una profunda zona acuátia. En este escenario aparece por segunda vez Hanabiran un Sub-Jefe del escenario de Hornet Man. | ||||
| Mapa |

|
Cartilla de Daño
Valores de daño que recibe cada una de las fases de Mega Mech Shark, de cada arma especial en Mega Man 9.
| Mega Mech Shark (Fase 1) | |||||||||||
|---|---|---|---|---|---|---|---|---|---|---|---|
| Mega Buster | Proto Buster | Concrete Shot | Tornado Blow | Laser Trident | Plug Ball | Jewel Satellite | Hornet Chaser | Magma Bazooka | Black Hole Bomb | ||
| 2 | 2:4* | 2 | 4 | 4 | 2 | 2 | 2 | 2:4* | 2 | ||
| Mega Mech Shark (Fase 2) | |||||||||||
|---|---|---|---|---|---|---|---|---|---|---|---|
| Mega Buster | Proto Buster | Concrete Shot | Tornado Blow | Laser Trident | Plug Ball | Jewel Satellite | Hornet Chaser | Magma Bazooka | Black Hole Bomb | ||
| 2 | 2:4* | 2 | 4 | 4 | 2 | 2 | 2 | 2:4* | 2 | ||
| Mega Mech Shark (Fase 3) | |||||||||||
|---|---|---|---|---|---|---|---|---|---|---|---|
| Mega Buster | Proto Buster | Concrete Shot | Tornado Blow | Laser Trident | Plug Ball | Jewel Satellite | Hornet Chaser | Magma Bazooka | Black Hole Bomb | ||
| 2 | 2:4* | 2 | 4 | 4 | 2 | 2 | 2 | 2:4* | 2 | ||
(*) Los dos dígitos de daño que aparecen en las armas, hacen referencia a:
"Disparo normal : Disparo Cargado".
Notaremos que los valores de daño que recibe cada fase de Mega Mech Shark no presentan ningún tipo de cámbio. Esto es debido a que el jefe que estamos enfrentando es el mismo, pero en diferentes partes de su cuerpo.
Estrategia
Escenario del Wily Castillo

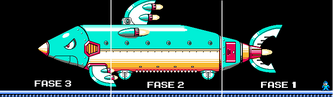
Gráfico completo de Mega Mech Shark con sus Fases en el escenario.
Aparece como jefe del Wily Castillo 2. Mega Man pása por la puerta del jefe que está en el extremo izquierdo de la pantalla, como si estuviese retrocediendo. Pása por una zona oscura y abierta del escenario. Se encuentra con Mega Mech Shark. Este jefe es muy grande, y no cabe en toda la pantalla, por lo que está dividida en tres fases, empezando por su parte trasera hasta su parte frontal. Sus movimientos son sólo levitar en el aire, por lo que en todas sus fases se la pasa levitando (arriba y abajo).
Fase 1

Mega Man contra la Fase 1 de Mega Mech Shark.
Cola: La primera parte de Mega Mech Shark. Tiene un lanzamisiles en su cola, es ahí donde el jugador debe disparar, pero sólo cuando se abre para lanzar sus misiles. Lanza 3 de ellos que van dirección al jugador para dañarlo (puedes disparles con el Mega Buster para destruirlos). El Laser Trident Puede vencer fácilmente a esta primera fase.
Fase 2

Mega Man contra la Fase 2 de Mega Mech Shark.
Torso: La segunda parte de Mega Mech Shark. Mega Man avanza en el escenario abierto del jefe y se detiene debajo de su torso. Esta segunda fase tiene dos cápsulas que fabrican Small Sharks (pequeños robot tiburones), y en medio Picos, que "no matan", pero sí pueden dañar al jugador. El punto débil de esta fase, són las cápsulas, puedes dispararles para infingir daño en él, pero ten en cuenta que mientras levita, el salto se te dificultará aun más, por los picos que están encima de ti, y cuando éstas cápsulas lanzen sus Small Sharks para embestirte, pero puedes disparles utilizando el Mega Buster, sin necesidad de esquivarlos saltando (aunque debes tener buenos reflejos al realizar dicha accíon). O el Tornado Blow que no sólo es la debilidad de éste pequeño enemigo tiburón, sino también de ésta segunda fase.
Fase 3

Mega Man contra la Fase 3 de Mega Mech Shark.
Cabeza: La tercera y última parte de Mega Mech Shark. Mega Man avanza en el escenario abierto del jefe y se detiene en su cabeza. Tiene un cañón instalado en su mandíbula que puede lanzar grandes rayos laser al jugador para dañarlo. Puedes esquivarlo mientras caminas o saltando (si éste jefe se encuentra a una altura baja). El Laser Trident puede vencer fácilmente a ésta última fase.
Escenario de Fake Man (Special Stage)


Gráfico completo de Mega Mech Shark con sus Fases en el escenario.
Aparece como Sub-Jefe en el Escenario Especial, antes de llegar a Fake Man. Mega Man camina hacia el extremo izquierdo de la pantalla, y pása por una zona oscura y abierta del escenario. Se encuentra con Mega mech shark. Sus fases son las mismas que en escenario del Wily Castillo 2, al igual que su patrón de ataque, y debilidades.
Curiosidades
- Mega Mech Shark tiene un cierto parecido a U-555, un Sub-Jefe de Mega Man X5 que aparece en el escenario de Duff McWhalen. Que también se divide en 3 fases, pero en diferente órden, ya que primero lo enfrentamos con su cabeza, luego con su cola y por último su torso.
