Liberation Mission is a turn-based event in MegaMan Battle Network 5 with the goal to liberate an area captured by Nebula and controlled by a Darkloid. Defeating the Darkloid will free the area from its DarkPower. Only one person can operate NetNavis in an occupied area, with Lan Hikari in charge of the operation of the team Navis. Folders can't be edited during a mission. The player can use the L button to view the mission area, R button to switch between the characters, and Start button to retreat and restart the mission. The folder cannot be changed during the mission, so prepare accordingly.
Each turn between the opposing sides is considered a "phase". The player takes his phase to operate each of his Navis, and once every Navi has taken or passed his or her turn, it passes on to the Darkloid's phase. During this, the Darkloid will heal up to 50% of his max HP and attack any nearby Navi, and after which any Guardians (special enemy units with their own field attacks) available will move and/or attack if they can.
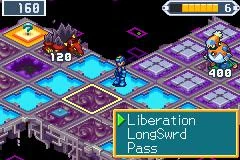
Liberation is the action of liberating panels. The player must defeat the viruses on the panel in three turns (a turn is equivalent to the Custom Gauge filling up - once it does it will automatically open without needing the player's input), or the liberation will fail. Defeating them in one turn will also liberate all Dark Panels surrounding the Navi. The more DarkPanels surrounding the Navi in his position before the fight, the harder the battle will be. If the player is surrounded in battle, he can use the L/R buttons to turn around. Some characters have special Liberation Abilities that allows to free more than one panel by the cost of Order Points, seen in the gauge in the top right of the screen. MegaMan for instance has the command "LongSword", which allows to liberate two panels in front of him.
If any participating Navi reaches 0 HP, the game is not over; instead they are paralysed for 2 phases, before they recover at 50% max HP. However, if all participating Navis reach this state, the game will be over. If a Navi passes their turn, they can also opt to recover 50% of their max HP unless they have been paralyzed by an attack or trap.
Liberation Abilities
The Navis taking part in the Liberation missions each have their own special abilities, which usually cost Order Points to use. Liberation Abilities that involve entering a battle will always have their full effect regardless of how much time was taken.
- MegaMan.EXE can use Long Sword, liberating 2 panels deep. One Turn Liberations also take effect when this ability is used.
- ProtoMan.EXE can use Wide Sword, and Colonel.EXE Screen Divide. Both of these abilities liberate 3 panels side-by-side. One Turn Liberations also take effect when this ability is used. While they are present, they can save the game.
- MagnetMan.EXE can use Magnet Barrier, allowing him to make all members of the team invulnerable to damage outside battle until the player's next phase.
- KnightMan.EXE is immune to damage outside battle. If he is standing on the same panel as a team member and that member is attacked, he can move to take the hit instead, nullifying damage dealt. This ability is passive and does not cost Order Points.
- GyroMan.EXE can move over Dark Panels without needing to Liberate. Also, whilst he is hovering over a Dark Panel that does not hold an item, he can use Bomb Liberation, liberating the panel beneath him without entering battle.
- ShadowMan.EXE can move over Dark Panels without needing to Liberate. Also, he can use Sneak Attack, dealing up to 500 damage to a nearby Darkloid or Guardian without needing to enter battle, but dropping the target's HP to 1 if the target could be deleted like this.
- NapalmMan.EXE can use Napalm, liberating in a cross-fashion centred 3 squares away, along with the panel in front of him. This will destroy all items except for keys, and will set off traps.
- TomahawkMan.EXE can use Tomahawk Swing, liberating a large area 2 panels deep and 3 panels wide. This will destroy all items except for keys, and will set off traps.
- SearchMan.EXE can use Panel Search, liberating all Dark Panels that hold items within a line, collecting all items and destroying all traps.
- NumberMan.EXE can use Number Check, checking an area 2 panels deep and 3 panels wide, collecting all items and destroying all traps without needing to enter battle. Affected Dark Panels revert to normal Dark Panels and will still need to be liberated.
- Meddy.EXE can use Twin Liberation. After invoking this ability, she enters a battle. Then, a Navi will have to travel to the other side of the line of panels and liberate it from the other end, hence liberating all panels between them. This is best used in combination with GyroMan and his ability to travel over Dark Panels. She can also save the game if she is present.
- ToadMan.EXE can use Rally Melody, granting a select Navi the ability to Liberate 5 panels deep. One Turn Liberations also take effect for the affected Navi. He can also save the game if he is present.
Panels
- Dark Panel: A purple panel tainted by Dark Power scatered through the area. The player must liberate them by fighting the viruses on it to reach the Darkloid. Dark Panels with a small gray detail in the middle contains items like Order Points, keys, Zenny and Battle Chips, and some may even hide traps that damage or paralyze whoever liberates them.
- Dark Hole: A purple panel that has a hole opening into a void. Liberating the Dark Hole will also liberate all panels surrounding it (unless those panels contain traps) and eliminate the Guardians spawned from it, regardless of how many turns were taken. Dark Holes will also spawn Guardians from time to time if left untouched. The player must liberate all Dark Holes to fight the Darkloid, as he is surrounded by indestructible panels.
- Bonus Panel: A "?" panel that may give items like BattleChips, Heart and Order Points, or trigger an event like making the team invincible for one phase or cause great damage to the closest enemy. A battle is not required to liberate this panel, and liberating this panel does not end the turn for the Navi. Bonus Panels will not contribute to changing the terrain's conditions when a Navi is liberating in proximity to it.
- Heart: The Navi who liberated the Bonus Panel has his/her HP restored to max.
- Battle Chip/Zenny: Gives a random Battle Chip or a set amount of Zenny respectively. Different Liberation missions have different possible Battle Chips or Zenny amounts.
- 1 Turn Invincibility: Until the player's next phase, the entire team becomes immune to damage outside battle, and also receives temporary invincibility during a battle. However, if a Navi affected by this invincibility enters battle, they will no longer be protected after the battle is finished.
- Major Hit: Instantly deletes the closest Guardian. If no Guardians are present, it deals damage to the Darkloid equal to 20% of his max HP.
- Barrier Panel: A white, numbered panel that cannot be crossed. To get past these panels, the key corresponding to their number must be found from a Dark Panel that holds an item.
Terrain
Depending on the layout of the Dark Panels surrounding the Navi, the Liberation battles may initiate with more or less area granted to the player. Dark Holes are also accounted when deciding the terrain during Liberation battles.
- One extra column - Triggers if the Dark Panel being liberated is the only Dark Panel within the surrounding 8 squares.
- No changes - Triggers if the Dark Panel being liberated has (relative to the Navi) one or two Dark Panels immediately to its left or right.
- One less column - Triggers if there is only one Dark Panel to the Navi's left or right when liberation commences. For battles against opposing Navis, it also triggers if the conditions for "Surrounded" are met instead.
- Surrounded - Triggers if Dark Panels are present on both sides of or behind the Navi when liberation commences. The Navi enters battle in the central 2 columns of the field, with 3 to 4 viruses occupying the remaining 4 columns on the sides. The L and R buttons allow for the Navi to change the direction they're facing mid-battle to attack different enemies. Despite this condition being least ideal, certain close-range Navis can utilize the reduced individual spaces to make the most of their special attacks.
Double Team DS
In MegaMan Battle Network 5 Double Team DS, if two or three Navis are standing on the same panel and have not battled yet, they can all enter the battle at once when a battle is initiated, using these Navis and the Party Battle System. If this is done, after the battle the Navis will have taken their turn and cannot take further action for the rest of the phase. Also, the player can edit his folder any time during the Mission, and can save once per phase regardless of which Navi is under control, instead of having to use ProtoMan, Colonel, Meddy, or ToadMan to save. X and Y is now used to switch between Navis, and L and R will allow the player to view the mission area. Pressing Start opens the menu, and retreating is done by touching the Retreat button on the touch screen.
The DS remake also adds Transport Chips, allowing the player to switch a Navi on their team with a Navi of a similar role from the opposing version. (e.g. KnightMan and MagnetMan) Performing this action will consume the Transport Chip for the Mission. Reverting to the original Navi has no cost, but switching them another time will consume another Transport Chip. A maximum of 3 Navis from the opposing version may be present at any one time, and swapping an injured Navi will not restore any HP. The player can find up to 4 Transport Chips per game version (and thus perform up to 4 swaps during a single mission), but most can only be obtained once the player has completed the main plot on both versions.
List of missions
Here is a list of Liberation Missions. If the player manages to complete the mission within the target number of phases, he will receive a Mega chip; if he does so in two or more phases faster than the target, he will get an even better Mega chip. Thus the player must actually complete each Liberation Mission twice to earn both Mega Chips. If the player takes longer than the target number of phases he receives Zenny instead.
The Darkloids within each Liberation Mission possess special out-of-battle attacks that they can use to harass the player's team on the field. They attack whenever any character falls within range, otherwise they will remain motionless and regenerate HP if possible.
Mission 1
- Darkloid: BlizzardMan.EXE
- Attack: Snowball - Damages all Navis within a 5x5 area centred around him.
- Area: ACDC Area 3
- Target Phase: 7
- Rewards: BlizzardMan SP, BlizzardMan, 1000z
- Navis (ProtoMan): MegaMan, ProtoMan
- Navis (Colonel): MegaMan, Colonel
Mission 2
- Darkloid: ShadeMan.EXE
- Attack: Dark Claw - Damages any Navi that's standing next to a Dark Panel.
- Area: Oran Area 3
- Target Phase: 9
- Rewards: ShadeMan SP, ShadeMan, 2000z
- Navis (ProtoMan): MegaMan, ProtoMan, MagnetMan
- Navis (Colonel): MegaMan, Colonel, KnightMan
Mission 3
- Darkloid: CloudMan.EXE
- Attack: Dark Cloud - Damages and paralyzes one Navi within a 5x5 area centred around him.
- Area: Scilab Area 2
- Target Phase: 9
- Rewards: CloudMan SP, CloudMan, 3000z
- Navis (ProtoMan): MegaMan, ProtoMan, MagnetMan, GyroMan
- Navis (Colonel): MegaMan, Colonel, KnightMan, ShadowMan
Mission 4
- Darkloid: Dark MegaMan.EXE
- Attack: Mega Buster - Damages all Navis within 3 squares of him, hitting 3 times each.
- Area: End Area 2
- Target Phase: 10
- Rewards: Full Custom, Anti-Navi, 4000z
- Navis (ProtoMan): ProtoMan, MagnetMan, GyroMan, NapalmMan
- Navis (Colonel): Colonel, KnightMan, ShadowMan, TomahawkMan
Mission 5
- Darkloid: CosmoMan.EXE
- Attack: Cosmo Planet - Damages one Navi within a 7x7 area centred around him.
- Area: End Area 5
- Target Phase: 9
- Rewards: CosmoMan SP, CosmoMan, 5000z
- Navis (ProtoMan): MegaMan, ProtoMan, MagnetMan, NapalmMan, SearchMan
- Navis (Colonel): MegaMan, Colonel, KnightMan, TomahawkMan, NumberMan
Mission 6
- Darkloid: Dark ProtoMan.EXE/Dark Colonel.EXE (depending on version)
- Attack: Wide Sword/Screen Divide - Damages all Navis within a 3x3 area centred around him.
- Area: Undernet 4
- Target Phase: 10
- Rewards: Z-Saber, ProtoMan/Colonel, 6000z
- Navis (ProtoMan): MegaMan, GyroMan, NapalmMan, SearchMan, Meddy
- Navis (Colonel): MegaMan, ShadowMan, TomahawkMan, NumberMan, ToadMan
Bonus Mission 1
- Darkloid: ShadeMan.EXE
- Area: Nebula Area 1
- Target Phase: 12
- Rewards: Black Wing, ShadeMan DS, 5000z
- Navis (ProtoMan): MegaMan, ProtoMan, MagnetMan, NapalmMan, SearchMan
- Navis (Colonel): MegaMan, Colonel, KnightMan, TomahawkMan, NumberMan
Bonus Mission 2
- Darkloid: CloudMan.EXE
- Area: Nebula Area 3
- Target Phase: 14
- Rewards: Muramasa, CloudMan DS, 5000z
- Navis (ProtoMan): MegaMan, GyroMan, NapalmMan, SearchMan, Meddy
- Navis (Colonel): MegaMan, ShadowMan, TomahawkMan, NumberMan, ToadMan
Bonus Mission 3
- Darkloid: CosmoMan.EXE and BlizzardMan.EXE
- Area: Nebula Area 5
- Target Phase: 16
- Rewards: Anubis, CosmoMan DS, 5000z
- Navis (ProtoMan): MegaMan, ProtoMan, MagnetMan, GyroMan, Meddy
- Navis (Colonel): MegaMan, Colonel, KnightMan, ShadowMan, ToadMan