(Separating some of the lines.) Tag: rte-source |
(Fixing some of the grammar and putting one last image.) Tag: rte-source |
||
| Line 48: | Line 48: | ||
===Gate's Laboratory Stage 2=== |
===Gate's Laboratory Stage 2=== |
||
| − | [[File: |
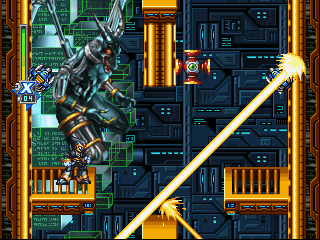
+ | [[File:Shot11.gif|thumb|294px|Gate Laboratory Stage 2 First Segment.]] |
The second stage split into two segment. The first is in a line stream of spike all around the wall and ground. Only way to get up is by climbing the rope upward. Afterwards, advancing through in-front where Nightmare enemies with in front by Giga Death B and nightmare. If you get hurt, go to top and refill it. But be quick and get out of there before being swarm by Nightmare Virus afterwards drop down and advance to the next area. Where it is being guarded with Totem Gate by ground and playform, Ground Sniper and Nightmare Virus. It can be skip with [[Blade Armor]] by dashing up to the Probe 8201-U platform. However if it is unarmored X or Zero, you needed to deal with the Totem Gate one by one, before you can advance upward right after the second one watch out for spike all over the top and ground as you getting on the platform to going to the left and climb the ladder head right. Where you face High Max. |
The second stage split into two segment. The first is in a line stream of spike all around the wall and ground. Only way to get up is by climbing the rope upward. Afterwards, advancing through in-front where Nightmare enemies with in front by Giga Death B and nightmare. If you get hurt, go to top and refill it. But be quick and get out of there before being swarm by Nightmare Virus afterwards drop down and advance to the next area. Where it is being guarded with Totem Gate by ground and playform, Ground Sniper and Nightmare Virus. It can be skip with [[Blade Armor]] by dashing up to the Probe 8201-U platform. However if it is unarmored X or Zero, you needed to deal with the Totem Gate one by one, before you can advance upward right after the second one watch out for spike all over the top and ground as you getting on the platform to going to the left and climb the ladder head right. Where you face High Max. |
||
| Line 55: | Line 55: | ||
The second segment in a straight line of corridor. Where the Meta Wheel F rolling through and Group Jet fly, destroy it and hop into the crystal and will travel into different stages that are previous stages from [[Nightmare Investigators]]. If is X it will be the remnant of [[Rainy Turtloid]] segment. While Zero is [[Metal Shark Player]] segment. |
The second segment in a straight line of corridor. Where the Meta Wheel F rolling through and Group Jet fly, destroy it and hop into the crystal and will travel into different stages that are previous stages from [[Nightmare Investigators]]. If is X it will be the remnant of [[Rainy Turtloid]] segment. While Zero is [[Metal Shark Player]] segment. |
||
| − | + | Unlike the investigator stages. These are much harder. With X is required to destroy the Weather Analyze before advancing to another portion of the level and the segment are require both [[Falcon Armor]] or [[Blade Armor]] to get through it with huge bottom pit where the platform are very wide away. Where Group Jet flying and Monbando guarding. The Hyper Dash parts are mandatory if you needed to get through with unarmored X, otherwise is impossible. While Zero had to cross through three parts of the crashing wave. The first part is easy where you needed to get to the hole and needed to duck. The second part is very tide where the Junkroid at their respective places. But it gets destroyed when the crash lay down. Where the player needed to duck and hang at the wall to wait before the crasher rise up again so the player can cross through it. The third and final part. Where it can no longer to be duck. It requiring to hang the wall by climbing at all time to prevent death. While Group Jet flying through it from the wall. Be Patient and you will get through without any problem and teleport back to the corridor segment that your character choosing respawn. After three more group jet fly by and enter the door and face gate. |
|
====First Segment==== |
====First Segment==== |
||
| Line 91: | Line 91: | ||
===Gate's Laboratory Stage 3=== |
===Gate's Laboratory Stage 3=== |
||
| + | [[File:Gate_Labortary_Stage_3.jpg|thumb|294px|Gate Laboratory Stage 3.]] |
||
Like the stage 2, it split into two segment. The first segment is after you crossing through a small gap and before wall slide down to one side of platform to another and watch out for spike right after the third one and make sure to fall at the right, otherwise death. At the right it got eight teleportation hatches which lead to "rematches" against the eight Nightmare Investigator. |
Like the stage 2, it split into two segment. The first segment is after you crossing through a small gap and before wall slide down to one side of platform to another and watch out for spike right after the third one and make sure to fall at the right, otherwise death. At the right it got eight teleportation hatches which lead to "rematches" against the eight Nightmare Investigator. |
||
Revision as of 13:05, 14 July 2016
Gate Laboratory (ゲイト Geito Kenkyūshitsu) is the secret hideout of Gate. It serves as the final stages for Megaman X6. The Hideout is where Eurasia Colony crashed site remains. The Gate lab is considered to be one of the hardest final stage in the whole X series. If not the most hardest since it require Parts or armors to advance if not it will be impossible.
Characteristics
More to come
Story
During the event of Megaman X5. Sigma try to awakening Zero true self by input his own virus with the help of Dynamo. The Eurasia colony caused by virus about to crashed. Fortunately, the Maverick Hunters had a plan to prevent this incident and manage to destroy the Eurasia. However, after destroyed another new threat had appeared. The Zero Virus. Which had spread at the location where Zero had landed creating Zero Space. X and Zero go into it and stop it at all cost. Until sometime later, they fought each other and end in stalemate. When Sigma arrived and try to destroy X. Zero get up unsuspecting and defend X and himself. Sigma retreat back. While Zero bring X back to the base. Where they infiltrate Cyberspace once more and finally defeated Sigma. But not without paying a price. Where both knock unconsciousness after blasted by Sigma ripped off both of their leg.
Three week later, a mysterious scientist knowns as Gate come and investigate the crash site and discovered the piece of Zero. While trying to analyse and become maverick himself. Where he build a utopia for reploid by beginning to creating a new type of virus to implode the event to fear among both human and reploid.
Gate's Laboratory Stages
Gate's laboratory consists three stage. Where it will unlocked after defeating all the eight Nightmare Investigators or defeat High Max in alternate path.
Gate's Laboratory Stage 1
Gate Laboratory Stage one.
The entrance begins in a hole and afterwards at the front. Where the player needed to get through the wall which is covering by spikes. Which are require the Ice Burst for X in additional with Jumper parts and/or Zero with Hyoroga abilities to passed through it. Afterwards. it will be sliding ice with laser shoots at the sliding part of the ice. After sliding through it. the player needed to climb the ladder at the top to avoid laser shoots directly vertically up and down. After passing through, it will be more laser with Wolfoid and Giga Death B. After that, you cross through the door. Where the rising flame from Blaze Heatnix beginning to rise.
If you quick. You can get to the door without touching otherwise it died. Later the fire comes back, where it needed to climb the wall to avoid the flame rising and go right before going down with the ladder and quickly get to right before the flame go up again. Afterwards, you needed to cross the ice slide ground to avoid the rising flame again and do not the touch the wall that are filled with spike to climb the ladder in zip zap line right and left. If you had enough time to get away from the fire and reach the door to face the first boss of the stage, Nightmare Mother.
Enemies:
Boss:
Gate's Laboratory Stage 2

Gate Laboratory Stage 2 First Segment.
The second stage split into two segment. The first is in a line stream of spike all around the wall and ground. Only way to get up is by climbing the rope upward. Afterwards, advancing through in-front where Nightmare enemies with in front by Giga Death B and nightmare. If you get hurt, go to top and refill it. But be quick and get out of there before being swarm by Nightmare Virus afterwards drop down and advance to the next area. Where it is being guarded with Totem Gate by ground and playform, Ground Sniper and Nightmare Virus. It can be skip with Blade Armor by dashing up to the Probe 8201-U platform. However if it is unarmored X or Zero, you needed to deal with the Totem Gate one by one, before you can advance upward right after the second one watch out for spike all over the top and ground as you getting on the platform to going to the left and climb the ladder head right. Where you face High Max.
Gate Laboratory Stage 2 Second Segment with X.


Gate Laboratory Stage 2 Second Segment with Zero.
The second segment in a straight line of corridor. Where the Meta Wheel F rolling through and Group Jet fly, destroy it and hop into the crystal and will travel into different stages that are previous stages from Nightmare Investigators. If is X it will be the remnant of Rainy Turtloid segment. While Zero is Metal Shark Player segment.
Unlike the investigator stages. These are much harder. With X is required to destroy the Weather Analyze before advancing to another portion of the level and the segment are require both Falcon Armor or Blade Armor to get through it with huge bottom pit where the platform are very wide away. Where Group Jet flying and Monbando guarding. The Hyper Dash parts are mandatory if you needed to get through with unarmored X, otherwise is impossible. While Zero had to cross through three parts of the crashing wave. The first part is easy where you needed to get to the hole and needed to duck. The second part is very tide where the Junkroid at their respective places. But it gets destroyed when the crash lay down. Where the player needed to duck and hang at the wall to wait before the crasher rise up again so the player can cross through it. The third and final part. Where it can no longer to be duck. It requiring to hang the wall by climbing at all time to prevent death. While Group Jet flying through it from the wall. Be Patient and you will get through without any problem and teleport back to the corridor segment that your character choosing respawn. After three more group jet fly by and enter the door and face gate.
First Segment
Enemies
Platform
Boss
Second Segment
With X
With Zero
Boss
Gate's Laboratory Stage 3


Gate Laboratory Stage 3.
Like the stage 2, it split into two segment. The first segment is after you crossing through a small gap and before wall slide down to one side of platform to another and watch out for spike right after the third one and make sure to fall at the right, otherwise death. At the right it got eight teleportation hatches which lead to "rematches" against the eight Nightmare Investigator.
After all eight are defeated, a ninth hatch will appear at the top, leading to a path filled with many Nightmare Virus, Batton Bone B81 and Giga Death B just before a large final pit and spike along the wall. Where a platform of Probe 8201-U fly by Jump on it and fend off any nuisances before entering beware of the spike inside, where Sigma awaits.
Enemies
Platform
Boss
Trivia
- The Gate Laboratory stage music is the remixed version of X-hunters Stage 2.